How to fix a flat bicycle tire
Sooner or later, you'll ride over some glass or perhaps hit a rut or hole and get a flat tire (also called a puncture). When this happens, don't panic! As long as you carry a few basic tools (which we can help you with), flat repair is easy—even fun! (Plus, if you don't know how to fix a flat, as long as you have the right spare tube and a pump with you, you can usually find another cyclist on the road or trail who will be happy to help you fix it–they might even teach you how!) Here's how it's done. Note that these instructions are for standard tires and tubes, and tubeless setups, and for road and mountain bicycles, too.
Tips
To extract rear wheels, it helps to pull the derailleur back slightly to clear the axle parts as the wheel passes through (main photo: click to enlarge). For fronts, you'll probably need to hold one side of the quick release and turn the other counterclockwise to create clearance to get past the wheel-retention ("safety") tabs on the fork (inset photo: click to enlarge). Tips
For Presta valves, unscrew the tip and press down to let all the air out. For Schraders, poke the end of the tire lever into the valve to release all the air. Starting directly opposite the valve, wiggle a tire lever beneath the tire's edge and pry down to lift. If possible, hook the lever on a spoke (many levers are made to do this), or hold it in place. Place another lever about 4 inches away from the first and pry here (main photo: click to enlarge). Continue with your third lever until you can get one side of the tire off. Then reach inside and fully extract the tube. Pull the other side of the tire off the same side of the wheel or pry it off with the levers. Tips
Tips
Then, stand the wheel up (rest it against your shins if needed) so that the valve hole is on top. Now, hold the tire/tube in front of the wheel so that the valve in the tube is on top and lining up with the valve hole (photo: click to enlarge). This is the starting position for putting the tire and tube back onto the wheel.
With both hands moving downward away from the valve using the ground to push against, finish working the bottom tire bead (the one closest to your legs) onto the wheel all the way around the wheel (photo: click to enlarge). If the bead is tight and doesn't want to pop onto the wheel, push on the tire sideways to move the bead down into the center and deepest portion of the rim (the rim "well"). This creates a little slack and lets you get that first tire bead onto the wheel all the way around. To get the bead started, you may have to push the valve up and into the tire to provide clearance for the bead (photo). Once you've got the bead started, work your hands away from the valve pressing the bead onto the rim around the wheel as you did in step 2 above. 4) With a few inches of bead left to pop onto the rim, the tire will resist. Let all the air out of the tube. Crouch and rest the wheel on your knee to have something to push against.
But don't try to pop it on all at once. Install an inch at a time, moving your hand along until you've fully installed the tire. If it resists, be sure all the air is out of the tire. Also, go around the tire/wheel and squeeze the tire with your hand to get the beads to move deeper in the rim, which will create a little more slack and help the tire go on. Got it? Good job! Tips
To prevent valve damage while pumping, brace the valve by wrapping a finger behind a spoke and your thumb over the tire (photo: click to enlarge) so you're pushing against your hand, not the valve. And hold the pump steady, don't wiggle it around as you pump. Inflate the tire until it's just firm (not fully inflated). At this point, inspect the tire to make sure it's "seated," which means that it's sitting correctly on the wheel. If the tube gets trapped beneath a bead (photo, below: click to enlarge), inflating further may blow the tire and tube off the rim! There are bead lines on the sides of the tire that should be equidistant from the rim all the way around on both sides of the wheel.
Tips
From the best pumps, to spare tubes, patch kits and flat-resistant tires and tubes, we have everything you need to ensure that you have a minimum of flat tires and an easy time fixing flats, too. We can also show you how to fix a flat. Just ask if you need any help at all. Thanks! |

 Carry the tire levers and spare tube in a seat bag or your hydration pack. Most pumps can be frame mounted for carrying or you can tuck it in your pack if you carry one, too.When you get a flat there are usually six easy steps to follow to fix it.
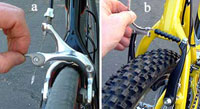 1. Open the brake: As soon as you get that "sinking" feeling or hear the hiss of escaping air, let your ride partners know you have a flat (so they won't disappear over the horizon) and stop in a safe spot. If it's a rear flat, shift onto the smallest rear cog. The first step in wheel removal (except for bikes with disc brakes) is opening the brake, which makes it easier to get the wheel out (photo: click to enlarge).
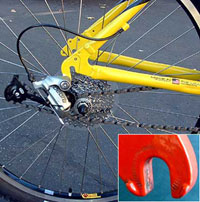 2. Remove the wheel: Open the quick release (or loosen the axle nuts) on the wheel with the flat and lift the bike to remove the wheel.
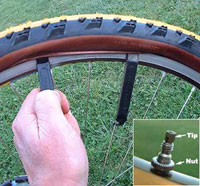 3. Remove the tire and tube: Remove the valve cap and nut (sometimes found on Presta valves: inset photo: click to enlarge).
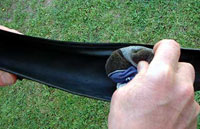 4. Inspect the tire: It's important to find whatever caused the flat and remove it. If you don't, the culprit might still be in the tire where it'll just pop your new tube! To find it, remove your glove (or use a rag), and run it around inside the tire in both directions (photo: click to enlarge). If something sharp is still stuck in your tire, it'll snag the glove. Remove the nasty. If you can't find anything, it's likely it got knocked out during the disassembly procedure.
 5. Install the tube & tire: 4 Easy Steps
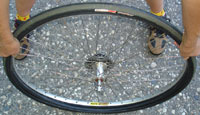 2) To mount the tire and tube, place the valve partway into the valve hole and simultaneously push the top section of the tire edge (called the "bead") that's at the valve and closest to your legs onto the rim. Note that you only put the tire bead on the side of the tire closest to you onto the rim for now. You'll put the other side's bead on later.
 3) With one bead fully in place, tuck the tube fully inside the tire and on top of the rim, which will cause the other bead to rest flush against the rim. Work this second bead on starting at the valve as you did with the first.
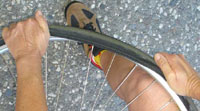 Now, hold the bead in place with one hand (we're using our left hand in the photo: click to enlarge) and with your stronger hand, push down to roll the stubborn section onto the rim with the heel of your hand.
 6. Inflate and seat the tire and reinstall the wheel: Place your pump on the valve and inflate the tire. Be sure to unscrew the tip of Presta valves and push them down to fully open them so you can get the air in. This is not needed with Schrader valves.
 If they're not, or if you see a section of tube peeking out from under the tire (photo), let the air out, poke the tube gently back into place with your tire lever (don't even think of using a screwdriver, which will pop the tube), reinflate partway and check the tire again.When it's seated correctly, inflate the tire fully. Install the valve nut (if your tube uses one) and cap finger tight (overtightening the valve nut can damage the tube and make it difficult to loosen it when you need to fix a flat). Reinstall the wheel in the frame, close the brake quick release or reattach the noodle or cable and you're ready to ride!